 Share
ShareWe all love a keyboard shortcut. They speed up your workflow, make repetitive tasks more bearable and they’re a great way to impress your friends!
At Coast, Adobe XD and Sketch are now our web design tools of choice, but Photoshop still gets plenty of use. Photoshop has an array of useful default shortcuts, but there are a few obvious ones that were initially missing. Luckily, Photoshop lets you change the defaults and even save them for future use.
These are the key combinations I’ve chosen to use for my custom shortcuts. To make your own, go to Edit > Keyboard Shortcuts. Click ‘Accept’ to override any existing functions. Obviously, if you want to keep the default shortcut, you’ll need to choose another key combination.
I use a PC but most of these tips should also apply to Macs, where you use Command instead of Ctrl.
-
- F5 – Rotate 90°This is an obvious one and very useful. You don’t even need to make ones that rotate right or left because you can just keep pressing F5 until your object is the right way around.
(Edit > Transform > Rotate 90° Clockwise)
- F6 – Flip horizontalThe best shortcut ever and pretty self-explanatory!
(Edit > Transform > Flip horizontal)
- F7 – Flip verticalThe other best shortcut ever!
(Edit > Transform > Flip vertical)
- F2 – Convert to Smart ObjectThis is really handy if you want to have the freedom to resize a raster object (generally a photo) larger and smaller without it losing its quality.
When you drag an image onto the canvas it becomes a Smart Object by default, but quite often the original image will be many times larger than it would need to be for the web or screen.
Once your project contains a number of these full-size original images, it can slow down even the fastest of PC’s. I always rasterise images, reduce their size (but always to a size that is slightly larger than I need) and then convert them into Smart Objects by hitting F2. This way you can enlarge or reduce your image size as often as required because a Smart Object will always reference its original state each time it is resampled.
(Layer > Smart Objects > Convert to Smart Object)
Top tip: If your client provides you with a folder of uncompressed TIFFs or very high-quality JPG images to use in your design, just batch process the whole lot down to about 2000 pixels wide. You won’t notice the lack of quality and you’ll greatly reduce the file size and the CPU power required to process your Photoshop file.
- F8 – Open the Unsharp Mask dialogue (use these settings: 15, 1.0, 0)Often, for images destined for the web, the standard Sharpen filter is too harsh. The Unsharp Mask shortcut using the above settings produces a subtle sharpening, which can be repeated by simply hitting F8 again.
(Filters > Sharpen > Unsharp Mask)
- F9 – Toggle TimelineUseful if you often edit animated gifs.
(Window > Timeline)
- Ctrl Shift A – Copy layer styleUseful if you want to quickly duplicate all of the styles of one layer to another.
(Layer > Layer Style > Copy Layer Style)
- F5 – Rotate 90°This is an obvious one and very useful. You don’t even need to make ones that rotate right or left because you can just keep pressing F5 until your object is the right way around.
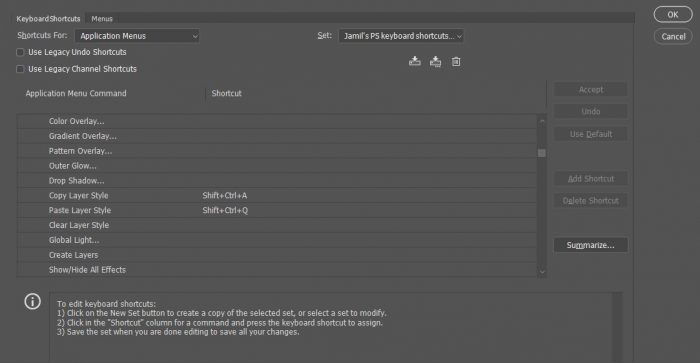
- Ctrl Shift Q – Paste layer style(Layer > Layer Style > Paste Layer Style)
- Ctrl Shift W – Open the Fill dialogue (with white set as default)I use this one all the time.
Ctrl-New Layer button + Ctrl Shift W + Enter = a new white layer below the layer you’re on. Boom.
(Edit > Fill)
- Ctrl Shift F – Open Stroke dialogueUseful if you happen to be doing a lot of stroking.
(Edit > Stroke)
- Ctrl Shift R – Convert to RGB ModeGIFs and PNGs in Photoshop open in Indexed Color mode by default. Before you can do any real manipulation, they need to be converted to RGB mode. This is a shortcut to do that.
(Image > Mode > RGB)
- Ctrl Shift Alt S (the ‘Claw’) – Save for WebThis is actually a standard Photoshop shortcut which was superseded by ‘Export As’ about three years ago. ‘Export As’ is great for saving multiple layers or layer groups, but Save for Web is quicker when saving a whole PSD as a web graphic or image.
Saving your shortcuts
You can save your custom shortcuts and even import them onto other workstations. I honestly can’t tell whether Adobe has managed to reliably tie your customisations to your Adobe CC account. As of March 2019, I don’t think they do, which is why it’s good to save your customisations.
All Photoshop’s default shortcuts are listed here.
Any others?
If you have any favourite shortcuts or tips to share, please let us know in the comments.
Next time…
Shortcuts and tips for Powerpoint, Word, Excel, Firefox and perhaps others. Stay tuned!
If you’d like help when it comes to graphic design for the web, speak to a member of our team today!